
D-Calc™ Version 5.0 Software Manual

SOFTWARE DESCRIPTION
Introduction
D-Calc 5 is an easy to use, user-friendly program for assessing the effects of damage on the strength of wood poles. This version is a departure from previous versions in that it is a browser-based Progressive Web App (PWA) that is supported on all devices (smartphones, tablets, personal computers) and operating systems (iOS, Android, Windows). D-Calc 5 also features new monthly and yearly licensing models and access to an API. Data are stored in a no-SQL format. D-Calc 5 data is not compatible with previous versions of D-Calc.
Description
The user enters the pole dimensions along with the location and description of the damage. The strength loss calculations are performed and the results may be printed. Up to three (3) layers of pole damage may be entered. Each damage layer may include up to four (4) damage types.
Platform Requirements
D-Calc 5 is a javascript-based progressive web app, which provides the same user experience across all platforms. The user interface will scale well across different device sizes (ranging from smartphone to desktop computer) and offers full functionality across all prevalent operating systems (Windows, Android, and iOS). D-Calc will be continually updated to match current operating systems and browsers. D-Calc will not be supported on operating system or browsers that are not currently supported (ie – Windows 7, Microsoft Internet Explorer, etc). At the time of writing of this manual, D-Calc is supported on:
- iOS 15, Safari 15
- Android 12, Chrome 96
- Windows 10, Edge 96
ACCESSING THE APPLICATION
The D-Calc application is a browser-based PWA; thus administrator privileges are not required to run D-Calc 5. The general access steps are outlined below. If there is a problem that cannot be resolved, please call EDM International at 1-970-204-4001 (or email info@edmlink.com).
Access Procedure: The following shows how to purchase D-Calc with a credit card from EDM’s online portal. If you do not wish to pay with a credit card, please contact EDM and we will set up an alternate payment type (through invoice and P.O.).
To access D-Calc 5, perform the following steps:
License D-Calc
-
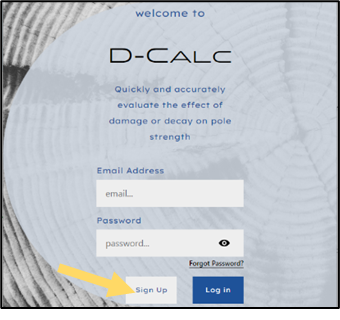
Go to https://dcalc.edmlink.com, click Sign Up.
-
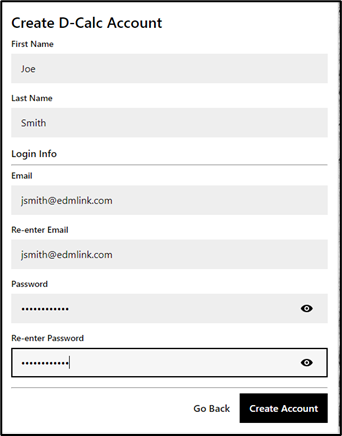
Fill in the information required on the form (Name, email, password), then click Create Account.
-
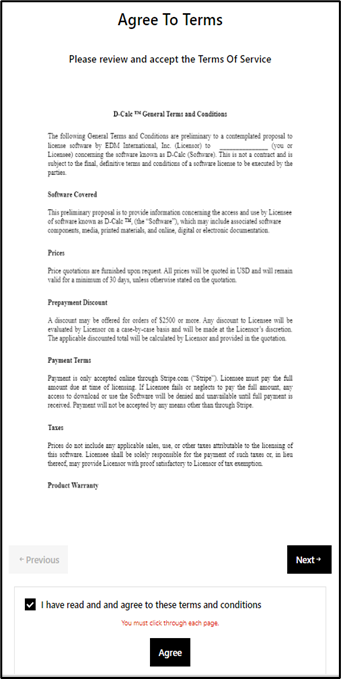
Read the Terms of Service. You must click through each page with the Next button. After clicking through all pages, you may then select the checkbox for agreement, and then click the Agree button. Repeat this same process for the Software License and the Privacy Policy.
-
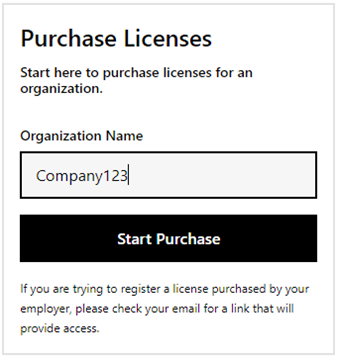
Enter your Organization Name and select Start Purchase.
-
Select your license type and click Next.
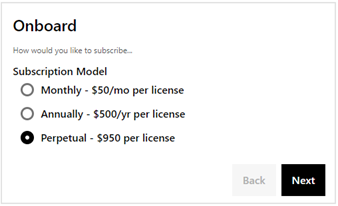
- Monthly – the license(s) will renew on a monthly cycle, and your credit card will be charged once/month. You may cancel any time.
- Annually – the license(s) will renew on a yearly cycle, and your credit card will be charged once/year. You may cancel any time.
- Perpetual – the license(s) will be permanent with no renewal cycle. Your credit card will only be charged one time.
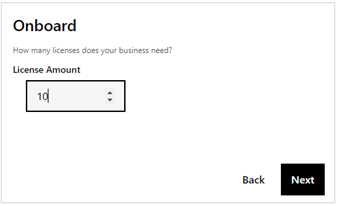
- Select the license quantity, and click Next.
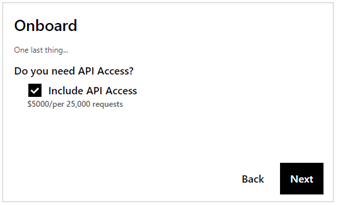
- If you need API access check the box. Click Next.
Note: Most D-Calc users do not need API access. Contact EDM or review the API section of this manual to determine whether API access may be a good fit.
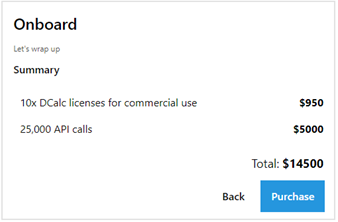
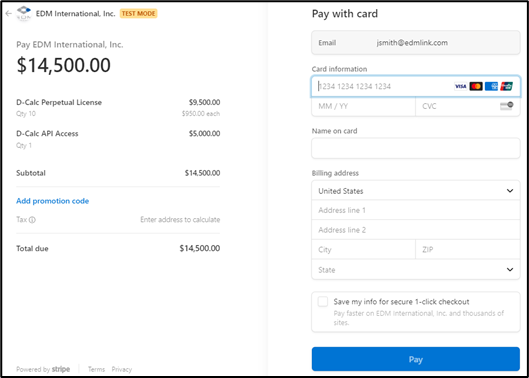
- A summary screen will review the purchase(s) and associated cost. Click purchase to proceed.
- After clicking Purchase, you will be routed to Stripe for checkout. Enter credit card information, then select Pay.
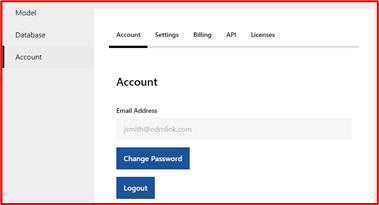
ADMINISTER YOUR D-CALC ACCOUNT
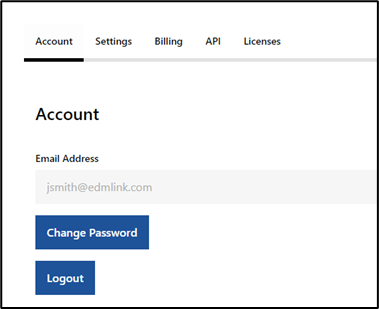
- After payment, you will be routed to the Account page of D-Calc. There are initially four tabs on the Account page: Account, Billing, API, and Licenses. If you register yourself as a D-Calc user, a Settings tab is added.
- From the Account tab, you may:
- Change your password
- Logout
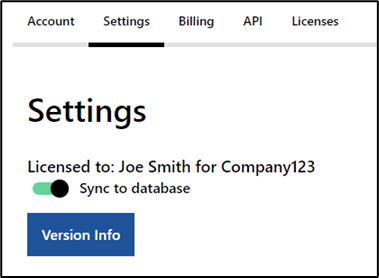
- From the Settings tab you may:
-Choose whether to sync to the Google cloud database
You may turn off database sync if you want to keep all data only on your local device. D-Calc uses Google Firebase as the back-end database by default, but does give control to the end user on whether or not to use this feature.
If you’ve been collecting D-Calc results locally, based on having Sync to database off, and decide you want to begin leveraging the Google back-end database, there is a new manual Sync option within the Database section that would push all locally stored results to the Google back-end database. Once the Sync to database is enabled, the system will automatically perform the Sync going forward.
-See the current version info
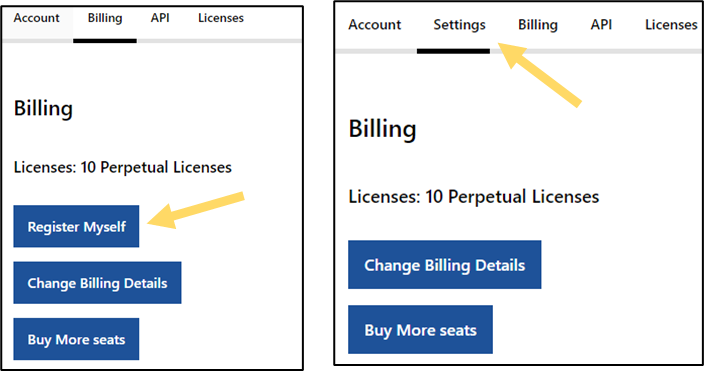
- From the Billing tab you may:
-Review current license count
-Register yourself (add your email address as a D-Calc license user)
-Change billing details (update a payment method, update the license term, update email and physical address, view invoice history)
-Buy more seats (purchase additional licenses) - Register myself only appears if the current admin is not a registered user. Once the admin registers themselves, that button disappears, and the Settings tab becomes available.
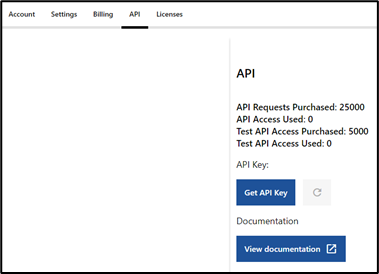
- From the API tab you may:
-View API limits and usage
-Get the API key (required to execute API calls)
-View API documentation, which is here
API tab, API usage and API Key are only available if API access has been purchased.
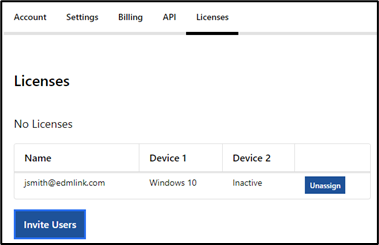
- From the Licenses tab you may:
-View current license holders in your organization
Note: each licensee holder may use D-Calc on up to two devices. The D-Calc account functionality will track this and show which devices are in use. If the user tries to use on a third device, D-Calc will demand that the license on one of the other devices be disabled first.
-Unassign license holders (this will free up the license for someone else to use -Invite new users (will prompt you to enter an email address--see next section)
ACCEPTING EMAIL INVITATIONS
As noted above, licenses are granted to users through email invitations sent through the Licenses tab of the Account page. After the administrator sends an invite, the recipient will receive an email (look for “edmlink.com” in the email address. Sometimes this gets sent to the Spam folder).
- Open the email, and then click on the link provided in the email. This will route you to the D-Calc home page.
- Click Sign up
- Fill in your name, email, and password.
- Click through all of the terms and agreements. Since the user is joining an existing organization (rather than creating a new one), they will not be asked for license quantities or payment info. Rather, after agreeing to the terms, they will be taken straight to the D-Calc register / sign-up page.
ADD D-CALC TO YOUR HOME SCREEN
A D-Calc app icon can be added to the “home” screen of a iOS, Android, or Windows device.
- From iOS
- Access the D-Calc PWA in Safari
- Log in to the app
- In the upper-right, click the share icon

- Select Add to Home Screen
- You will see a preview of the D-Calc icon. Click Add
- From Android
- Access the D-Calc PWA in Chrome
- Log in to the app
- Tap the menu options icon (three vertical dots)

- Select Add to Home Screen
- You will see a preview of the D-Calc icon. Click Add
- From Windows
- Access the D-Calc PWA in Edge
- Log in to the app
- Click the settings icon in the upper-right (three horizontal dots)

- Select “AppsInstall this site as an app”
- Click “install”
EXAMPLES
Example 1:
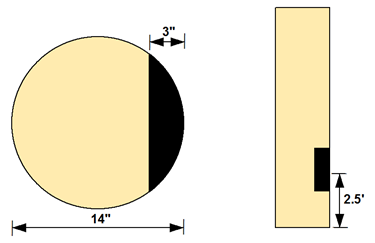
A 45’, class 3, southern pine distribution pole has been hit by a passing vehicle resulting in a 3.0” deep gouge 2½’ above the ground. The pole measures 14” in diameter directly above the damaged area.
To Assess the Damage Proceed as Follows:
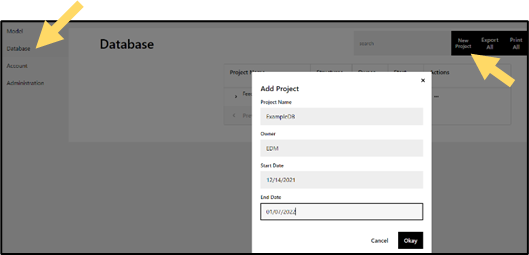
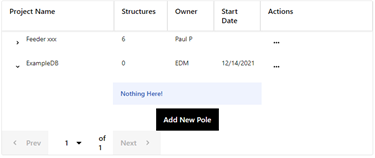
- Click the Database menu, and then select New Project to create a D-Calc project. The Add Project dialog appears. Enter a Project Name - ExampleDB. Optionally enter a project owner name, a project start date, and a project end date. Click the Okay button to save the project in the database.
- Click the > button to select that Project as the Current Project. Then select Add New Pole. The Project Name will transfer into the Pole Info section of D-Calc and a Structure Name for the pole will be generated by the system, unless overriden by the user.
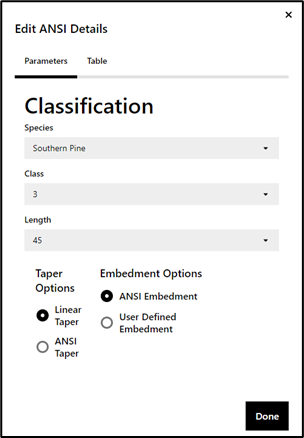
- Click the Edit ANSI Details button to enter the ANSI specifications for the pole. Select Species (Southern Pine), Class (3), and Length (45). Also select Linear Taper and ANSI Embedment. Then click Done to return to the main screen.
- On the main screen, enter the actual dimensions of the pole and the location of the damage. Since you measured the diameter, click into the Diameter text box, and input 14 (units are inches). Then, enter 2.5 as Distance From Groundline (ft) to show that the damage is 2½’ above the ground.
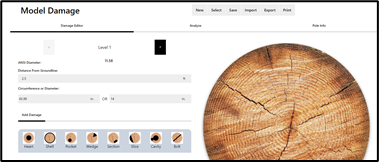
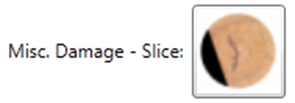
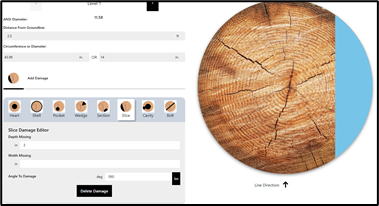
- Click on the icon for Misc. Damage – Slice in order to enter a damage description.
- The damage can then be described in the text boxes which appear below the damage icons as follows: 3 for the Depth Missing (in) dimension, and 90 for Angle to Damage (deg.). (You can repeat this step with different values to see how the damage can be increased or decreased and moved around the pole). As you update the parameters, the pole graphic (to the right on large screens and below on small screens) will update.
- Now, click the Analyze tab (top-center of the screen). The results indicate that the pole has 91% remaining section modulus in-line and 68% remaining transverse, based upon the actual pole size. The ANSI COMPARISON results show that the pole was oversized to begin with and retains 161% of its in-line section modulus and 120% transverse. This pole, which would be rejected by most evaluations, has a larger section modulus than required by ANSI minimums for an undamaged pole of the same class.
Example 2:
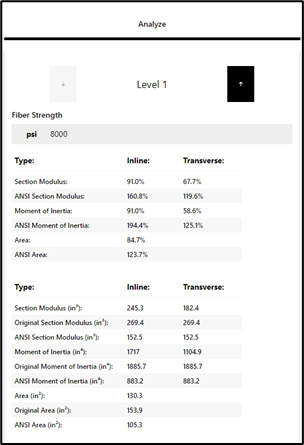
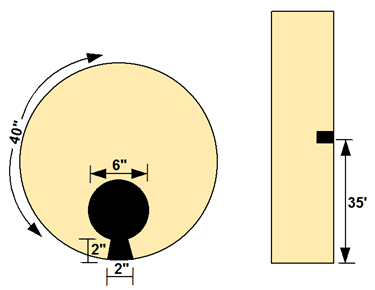
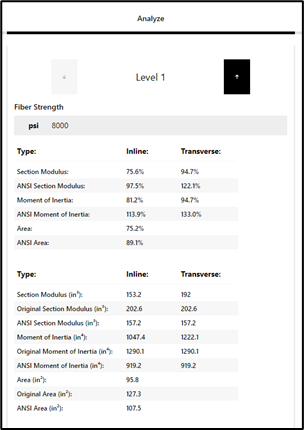
A 70’, class 1, Douglas-fir transmission pole has a woodpecker nest 35’ up the pole. The nest is 6” in diameter, has a 2” entry hole and a 2” outside shell remaining. The entry hole opens in the line direction. A tape measure was used to measure the circumference directly above the nest at 40”.
To Assess the Damage Proceed as Follows:
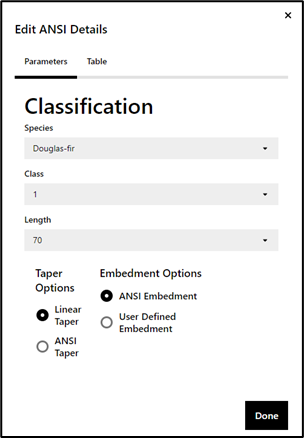
- Click the New button to start a new pole, then click the Edit ANSI Details button to enter the ANSI specifications for the pole. The ANSI Classification dialog appears. Enter Species (Douglas-fir), Class (1), and Length (70). Set the taper to Linear Taper and the embedment to ANSI Embedment. Click Done to return to the main screen.
- On the main screen, enter the actual dimensions of the pole and the location of the damage. Since you measured the circumference, enter 40 into the Circumference text box. Then, enter 35 as Distance From Groundline (ft) to show that the damage is 35’ above the ground.
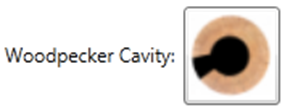
- Click on the icon for Woodpecker Cavity in order to enter a damage description
- Enter 2 for Circumference Missing (in), 2 for Shell Thickness at Opening (in), 6 for Nest Diameter (in), and 180 for Angle to Opening (deg)

- Click the Analyze tab. The results indicate that the pole has 76% remaining section modulus in-line and 95% remaining transverse, based upon the actual pole size. The ANSI COMPARISON results show that the pole was oversized to begin with and retains 98% of its in-line section modulus and 122% transverse.
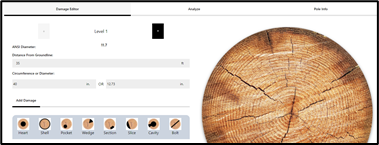
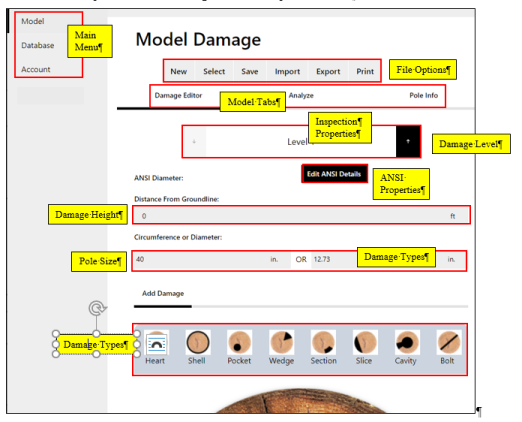
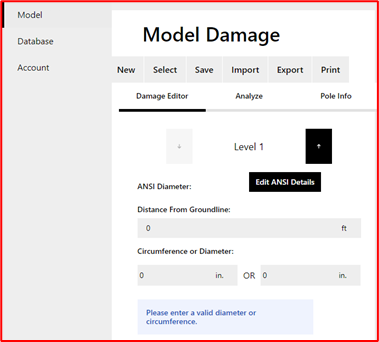
USER INTERFACE
The interface of the main form of D-Calc has ten (10) major components:
- Main Menus
- File Options
- Model Tabs
- Damage Level
- ANSI Properties
- Damage Height
- Pole Size
- Damage Types
Each of these components is shown in the figure below. For more information on each click on the link in the sidebar.
MAIN MENU
The Main Menu consists of three items:
-
Model – provides access to the Damage Editor, Analyzer, and Pole Info tabs, as well as the File Options
-
Database – allows users to create a new project in the database, set the current project, select a specific record in the database, export all records in a database to .csv, and print all records in a database to .PDF
-
Account – allows users to manage their account. Tabs include:
- Account: change password or log out
- Settings: turn off sync to online Google database and view Version info
- Billing: view current license count, update billing details, and buy more licenses
- API: view API request stats, get API key, link to API documentation
- Licenses: view current license-holders, unassign current license holders, invite new license holders

- On larger screens (laptop/ desktop computers and tablets), the Main Menu will appear in the top-left
\ - On smaller screens (smartphones), the Main Menu will appear in the top-right as three horizontal lines
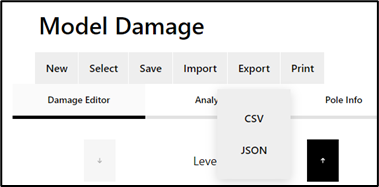
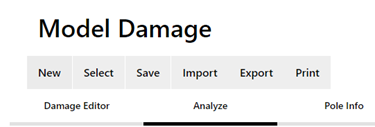
FILE OPTIONS
The File Options toolbar is accessed through the Model Menu and consists of six items.

- New – Add a new pole and enter data for up to three (3) damage levels with each level having up to four (4) defects. If current data has not been saved when the New button is pressed, the user will be prompted to save any unsaved current data prior to entering data for a new pole.
- Select – Click the Select button to automatically switch to the Database menu item and select damage data for a level of a pole that currently exists in the selected D-Calc project.
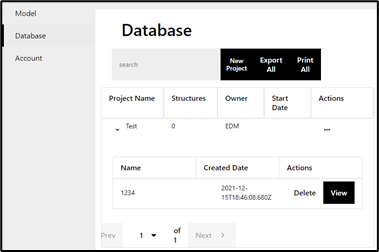
A selection is made by clicking on the > icon next to a given project, then clicking the View button next to a particular record. The main Model Damage Editor form is populated and the graphic, representing the damage on the selected level is displayed. A row (damage level for a pole) may be deleted from the grid (and database) by clicking the Delete button next to the respective record.
- Save – When the Save button is pressed, the defect data for all three levels of the current pole are saved in the currently selected D-Calc project in the database. To save data a project must have been selected. If no existing project has been selected, D-Calc will prompt you to select one. If there are no projects created, D-Calc will prompt you to create one (which will then automatically become the currently selected project).
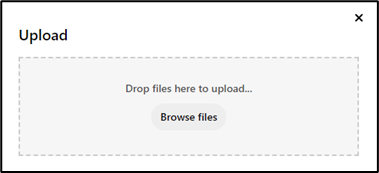
- Import – Damage data from previous runs of D-Calc may be imported into the currently selected D-Calc project. Imports may be in .csv or .json format, and must have been exported from D-Calc 5 or higher. Previous versions of D-Calc are not supported.
- Export – Data for a pole selected from the currently selected D-Calc database may be exported to a single file as either .csv or .json. These export formats may be later imported back into D-Calc (on another computer, for example), or used for integrations with external applications. Batch exports of an entire database to .csv can be performed from the Database menu item.
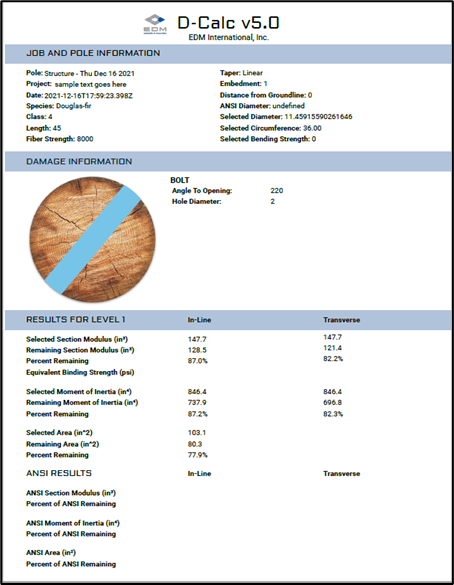
- Print – Formats and prints the input data and analysis results for the currently selected pole. Batch prints to PDF of an entire database to PDF can be performed from the Database menu item.
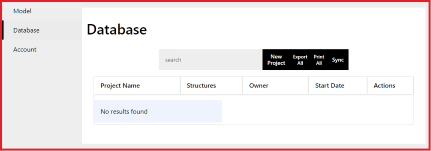
DATABASE
The Database menu page consists of several items:
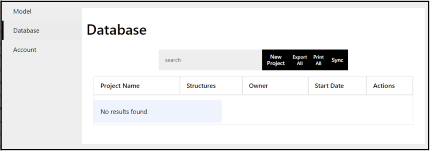
- Search – Type in any text string to filter Projects and Poles that meet the query
- New Project – Creates a new project within the database. User is required to enter a project name, and can optionally add data for Owner, Start Date, and End Date
- Export All – Exports all records in the database (from all projects) to a .csv file
- Print All – Prints all records in the database (from all projects) to a PDF file
- Sync – If Sync is enabled within the Account Settings, this allows users to manually Sync Projects and Poles that were captured while in offline mode
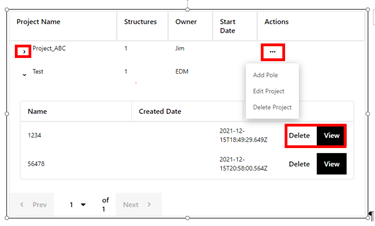
- Project/pole grid – Project grid lists all projects by Name, # of poles, Owner, and Start Date; Pole grid lists all poles and includes the Name, Species, Length, Class, and last Update Date.
- Can click the “>” icon to drill down into a project and view all poles
- Can view or delete individual poles
- Can click the “…” icon to perform actions against the Project
- Add Pole
- Edit Project Info
- Delete Project
- Can click the “>” icon to drill down into a project and view all poles
ANSI DATA
The user may choose to base their analysis on the “minimum” pole dimensions specified in the American National Standards Institute for Wood Poles – Specifications and Dimensions (ANSI O5.1). This information can be automatically accessed by selecting the pole species, class, and length.
In addition, entering ANSI information enables D-Calc 5 to compare the results of analyses based on actual field-measured dimensions of pole size and damage to the properties of an ANSI O5.1 “minimum” dimension pole.
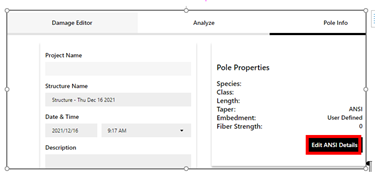
The ANSI information can be access through two locations. Both locations will take the user through the same workflow.
- From the Model menu page, Damage Editor tab, click Edit ANSI Details.
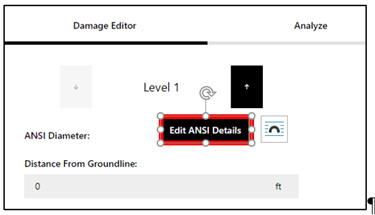
- -or- From the Model menu page, Pole Info tab, click Edit ANSI Details.
ANSI - When the Edit ANSI Details button is pressed, the ANSI Classification dialog appears.
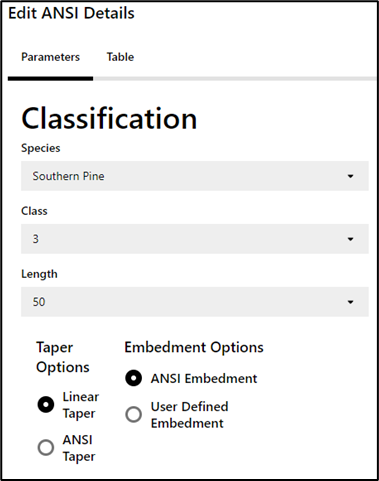
The ANSI Classification data is:
- Species - Allows you to select or change the species of the pole to be analyzed.
- Class - Used to select the ANSI O5.1 pole class.
- Length - Gives you the capability to choose pole length.
- Taper Option - Allows you to select the method used to calculate the pole taper. This function is used by D-Calc 5 to calculate the equivalent ANSI O5.1 minimum diameter at a location along a pole’s length other than 6’ from its butt. User can choose either a Linear Taper or an ANSI Taper.
- Embedment Option - Allows you to choose either ANSI Embedment or User Defined Embedment. ANSI Embedment is computed as 10% of pole length (feet) + 2 feet.
- Table - Gives you access to a table of the ANSI O5.1 minimum circumferences at 6’ from the butt of a given species of pole.
- “This material is reproduced with permission from American National Standard for Wood Poles – Specifications & Dimensions (ANSI O5.1), copyright 1992, by the American National Standards Institute. Copies of this standard may be purchased from the American National Standards Institute at 11 West 42nd Street, New York, NY 10036, or http://www.webstore.ansi.com.”
The table of the ANSI O5.1 minimum circumferences is:
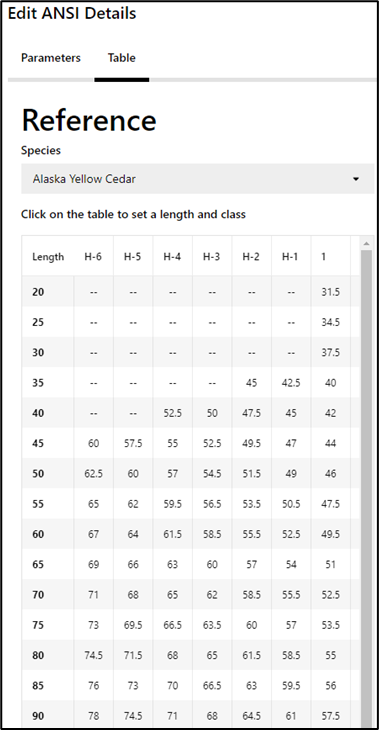
Clicking on an invalid cell of the table (--) would result in an invalid set of ANSI parameters. D-Calc does not allow users to select invalid parameters. For example, if the user attempts to choose Species: Alaska Yellow Cedar, Class: 7; Length: 55 nothing will happen as D-Calc will not allow this selection combination. Similarly, in the dropdown list workflow, invalid species-class-length combinations simply are not available.
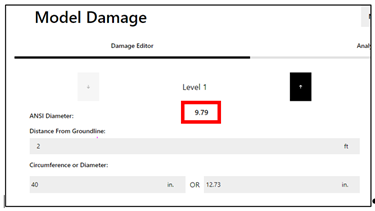
After entering valid ANSI classification data, the Pole Properties window, located in the Pole Info Tab, will be populated with the summary information. On the Damage Editor Tab, the calculated ANSI diameter for the given Distance from GroundLine will also appear on the top-center of the screen.
You do not need to use the ANSI menu if you want to base your analysis solely on the dimensions of the pole and damage as measured in the field.
DAMAGE LEVEL
On the Damage Editor tab, the user can select up to three levels of damage/defects. Level refers to height above ground. For example, the user could define a wedge at 2.5’ above groundline, a bolt hole at 5’ above groundline, and a woodpecker cavity at 25’ above groundline.

For each level, up to four defects can be specified. Thus, D-Calc 4 can model a pole with up to 12 total defects (four defects on three different levels).
In many cases, the user will need to report only one defect on one level. In such cases, the Damage Level Selection will not need to be changed, and can stay at the default level of “1”.
For each damage level entered, the user should also enter a Distance From Groundline.
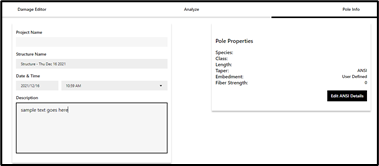
POLE INFO
In the Pole Info tab, the user can enter a name and date/time for the Structure (Pole). The date defaults to the date when the database record for this pole was created, but it can be overridden to custom values. Miscellaneous comments can also be noted in the Description text box. Lastly, the ANSI information for the pole may be entered on this tab. All data on this tab are optional.
DAMAGE TYPES
To select a damage type and to analyze the damage, D-Calc 5 requires you to input the measured pole size (circumference or diameter).
Once the measured diameter or circumference is entered, the Add Damage dialog becomes available and the pole graphic will appear. You may then select a Damage Description. Damage can be assigned by using any combination of the eight damage types shown on the bottom of the main screen of the Model tab. You may enter up to four defects per Damage Level.
To begin entering damage, click on one of the eight damage types. A parameter box will appear immediately below the Add Damage dialog to allow entry of the data required for the first damage type. To add additional damage types (up to four), click the Add Damage button, and then click the second damage type. A new icon will appear at the top of the Add Damage dialog. You can update/edit damage types by clicking on the respective icon. Damage types and parameters are discussed in detail in the section Damage Types and Parameters.
When you have completed the description for the damage type the Pole Graphic will automatically update to depict the damage as you had configurated it. Repeat the process as needed, up to four damage types per level (location), in order to completely describe the damage at this location. Each damage type will appear on the cross section as a different-colored graphic.
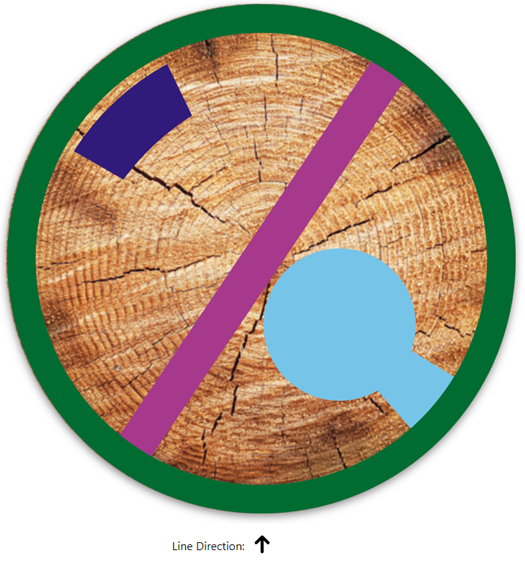
The orientation of the damage relative to the line direction is important for bending strength calculations, as the effect of eccentric damage on bending strength is different in the In-Line (parallel to line) and Transverse (perpendicular to- line) directions.
If you wish to change the size or orientation of any of the four defects, simply click on any of the defect icons shown at the top of the Add Damage dialog and make appropriate modifications. If you need to change damage types or remove damage, click on the respective defect icon, and select Delete Damage.
ANALYZER
When all defects have been defined, at all levels/locations, click the Analyze tab to analyze and report the damage to the pole.
The Analyze command and Results viewing are discussed in detail under the Analyze & Results link.
DAMAGE TYPES & PARAMETERS
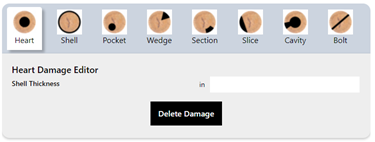
Heart Damage/Rot
One input item is required to describe the degree of Heart Rot:
-
Shell Thickness: Minimum shell thickness (inches). D-Calc 5 assumes that the Heart Rot is concentric and, therefore, that this thickness applies to the entire circumference.
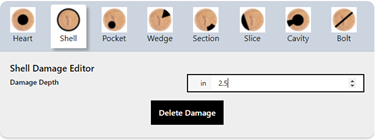
Shell Damage/Rot
One input item is required to describe the degree of Shell Rot:
-
Damage Depth: radial depth (inches) of the damage relative to the original surface of the undamaged pole
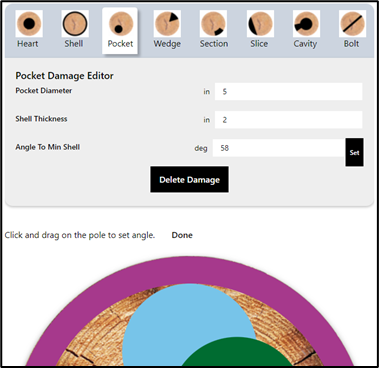
Pocket Damage/Rot
Three input items are required to describe Pocket Rot:
- Pocket Diameter: Diameter (inches) of the pocket
- Shell Thickness: Minimum thickness (inches) of the wood at the point where the pocket comes closest to the pole’s surface
- Angle to Min Shell: Angle (degrees) of the pocket relative to the line direction
Note: You can input the angle through the text box or by clicking on the Set button in the bottom-right, and then clicking on the pole graphic. Then click Done after setting the angle. This applies to Pocket Damage, Wedge, Section, Slice, Woodpecker Cavity, and Bolt Hole.
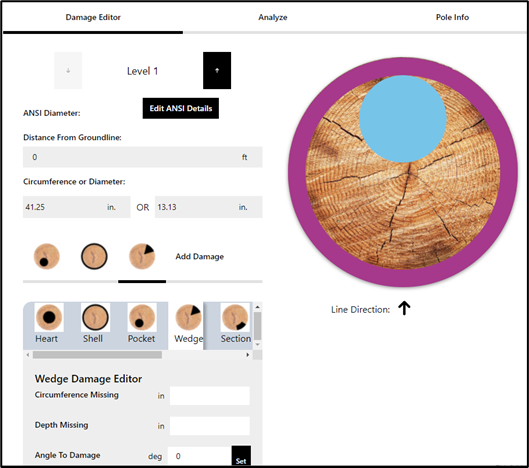
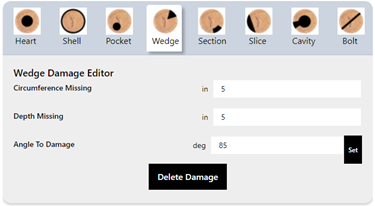
Misc. Damage - Wedge
To describe Wedge damage input:
-
Circumference Missing: circumferential extent (inches) of the damage
-
Depth Missing: radial depth (inches) of the damage
-
Angle to Damage: the angle (degrees) of the damage relative to the line direction
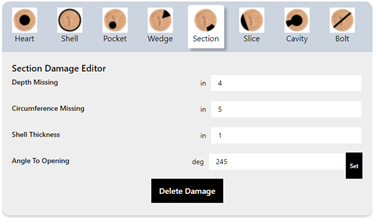
Misc. Damage - Section
Three input items are required to describe Section damage:
-
Depth Missing: radial depth (inches) of the damage
-
Circumference Missing: circumferential extent (inches) of the damage
-
Angle to Damage: the angle (degrees) of the damage relative to the line direction
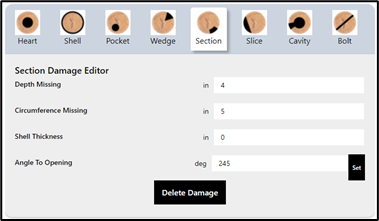
Note: The Misc. Damage – Section damage type can be used with a non-zero shell thickness, in other words, a wedge under the surface. This could be used to model the effects of a wedge-shaped interior rot, or something similar, where the Pocket Damage type does not sufficiently describe the shape. To do this, input a non-zero Shell Thickness, a Depth Missing greater than the Shell Thickness, and any Circumference.
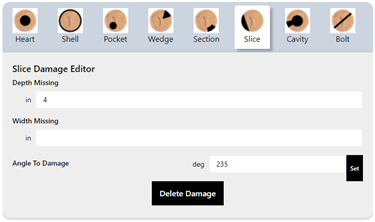
Misc. Damage - Slice
Two input items are required to describe Slice damage:
- Depth Missing: radial depth (inches) of the damage
OR
- Width Missing
AND
- Angle to Damage: the angle (degrees) of the damage relative to the line direction
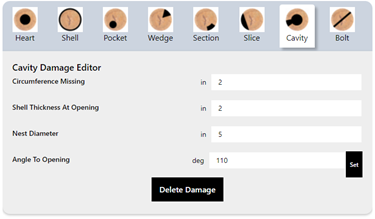
Woodpecker Cavity
Four input items are required to describe a Woodpecker Cavity:
- Circumference Missing: circumferential extent (inches) of the damage
- Shell Thickness At Opening
- Nest Diameter: inner nest diameter (inches)
- Angle to Opening: the angle (degrees) of the opening relative to the line direction
Bolt Hole
Two input items are required to describe a Bolt Hole:
- Hole Diameter
- Angle At Opening: the angle (degrees) of the hole relative to the line direction

ANALYZE & RESULTS
The Analyze tab enables you to evaluate the loss of section modulus due to the pole damage and to select similar analyses to determine cross-sectional area and moment of inertia reductions.
After entering the pole measurements, ANSI classification (optional) and damage type(s) for one or more levels, click the Analyze button to evaluate the damage and view results. If, in addition to entering the actual field-measured dimensions of the pole, you entered a description of the pole using ANSI O5.1 dimensions, the results of a comparison of the damaged pole to an undamaged ANSI O5.1 minimum dimension pole will also be displayed.
Note: Shell Damage and Heart Damage are evaluated with 100% accuracy using closed form solutions. The other types of damage are evaluated using numerical integration techniques that are typically accurate to within plus or minus 3% of the true value. The accuracy of these techniques will decrease slightly when severe pole damage causes a reduction of 70% or more in the section modulus, moment of inertia, or area.
The analytical formulae for the in-line and transverse Moments of Inertia and Section Moduli are:
- Ii, It = πd4/64
- Si, St = πd3/32
When viewing the Results window, you can click view results for each level of damage:
- Percent Remaining of Section Modulus, Moment of Inertia, and Area
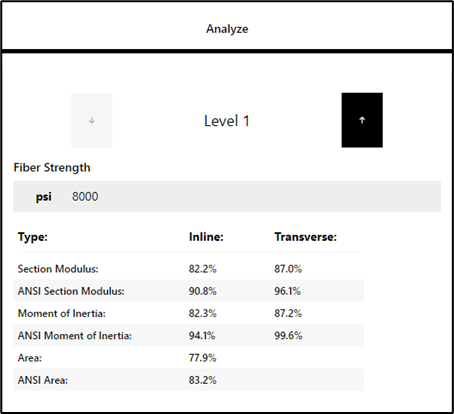
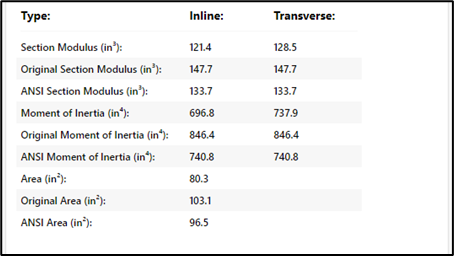
- Actual Values of Section Modulus, Moment of Inertia, and Area
- Percent Strength remaining for Section Modulus, and remaining strength in psi
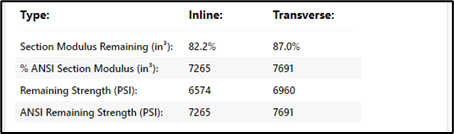
The strength equivalency function allows D-Calc 5 to calculate an equivalent material strength for the damaged pole based on an input strength. D-Calc™ estimates the reduced strength values by multiplying the strength you input by the percentage of remaining section modulus or area of the damaged pole, whichever you select. Results are displayed based on both the field-measured dimensions of the pole and damage, and a comparison of the damaged pole to an undamaged ANSI O5.1 minimum dimension pole (if the ANSI O5.1 information was entered).
Note that D-Calc 5 allows you to calculate an equivalent material strength (in psi) for the damaged pole based on an input strength.
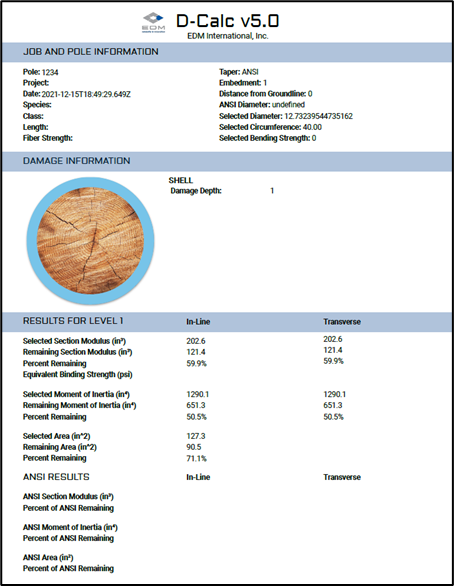
After analyzing the results, they can be printed to pdf as shown in the print dialog below.
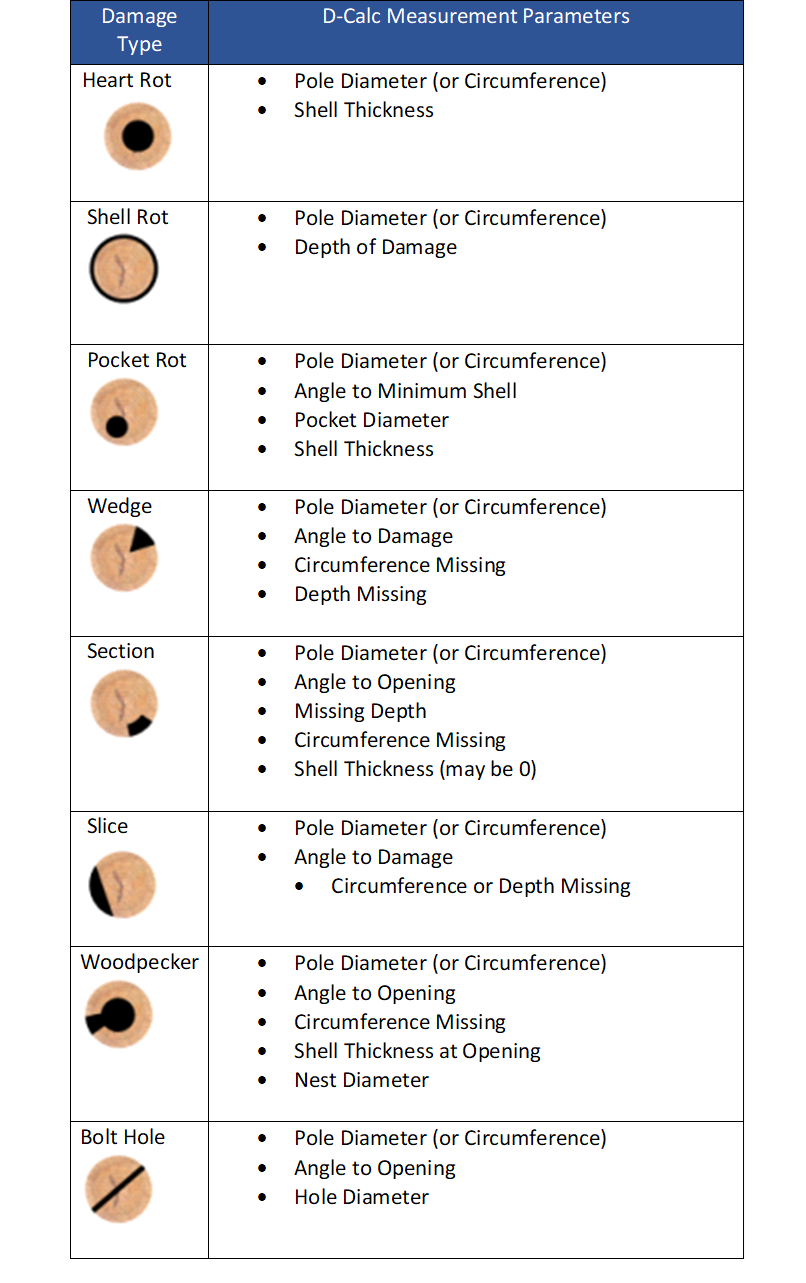
TABLES OF DEFECT PARAMETERS
The table below shows the required parameters for each defect.
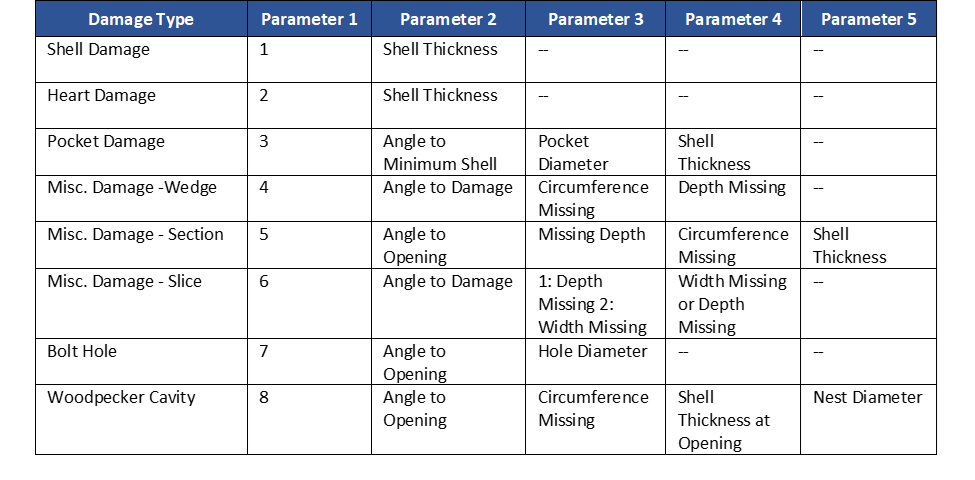
The Damage Types and Measurement Parameters are shown below:
API
D-Calc has a full API. This API requires internet connectivity, and there is no offline mode. For offline integrations, we recommend the App Linking approach, described here.
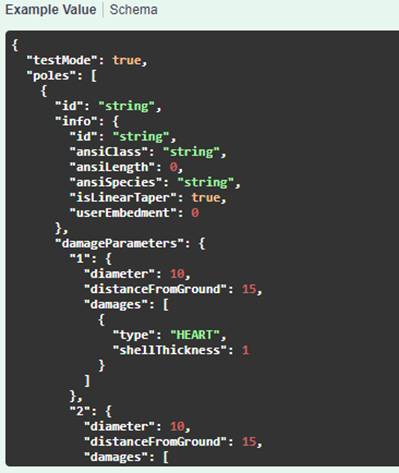
The API accommodates passing input parameters through a JSON string, and returns a JSON string with outputs. Complete API documentation may be viewed here. Please also contact EDM International for more information and to learn if the API is a good fit for your needs.
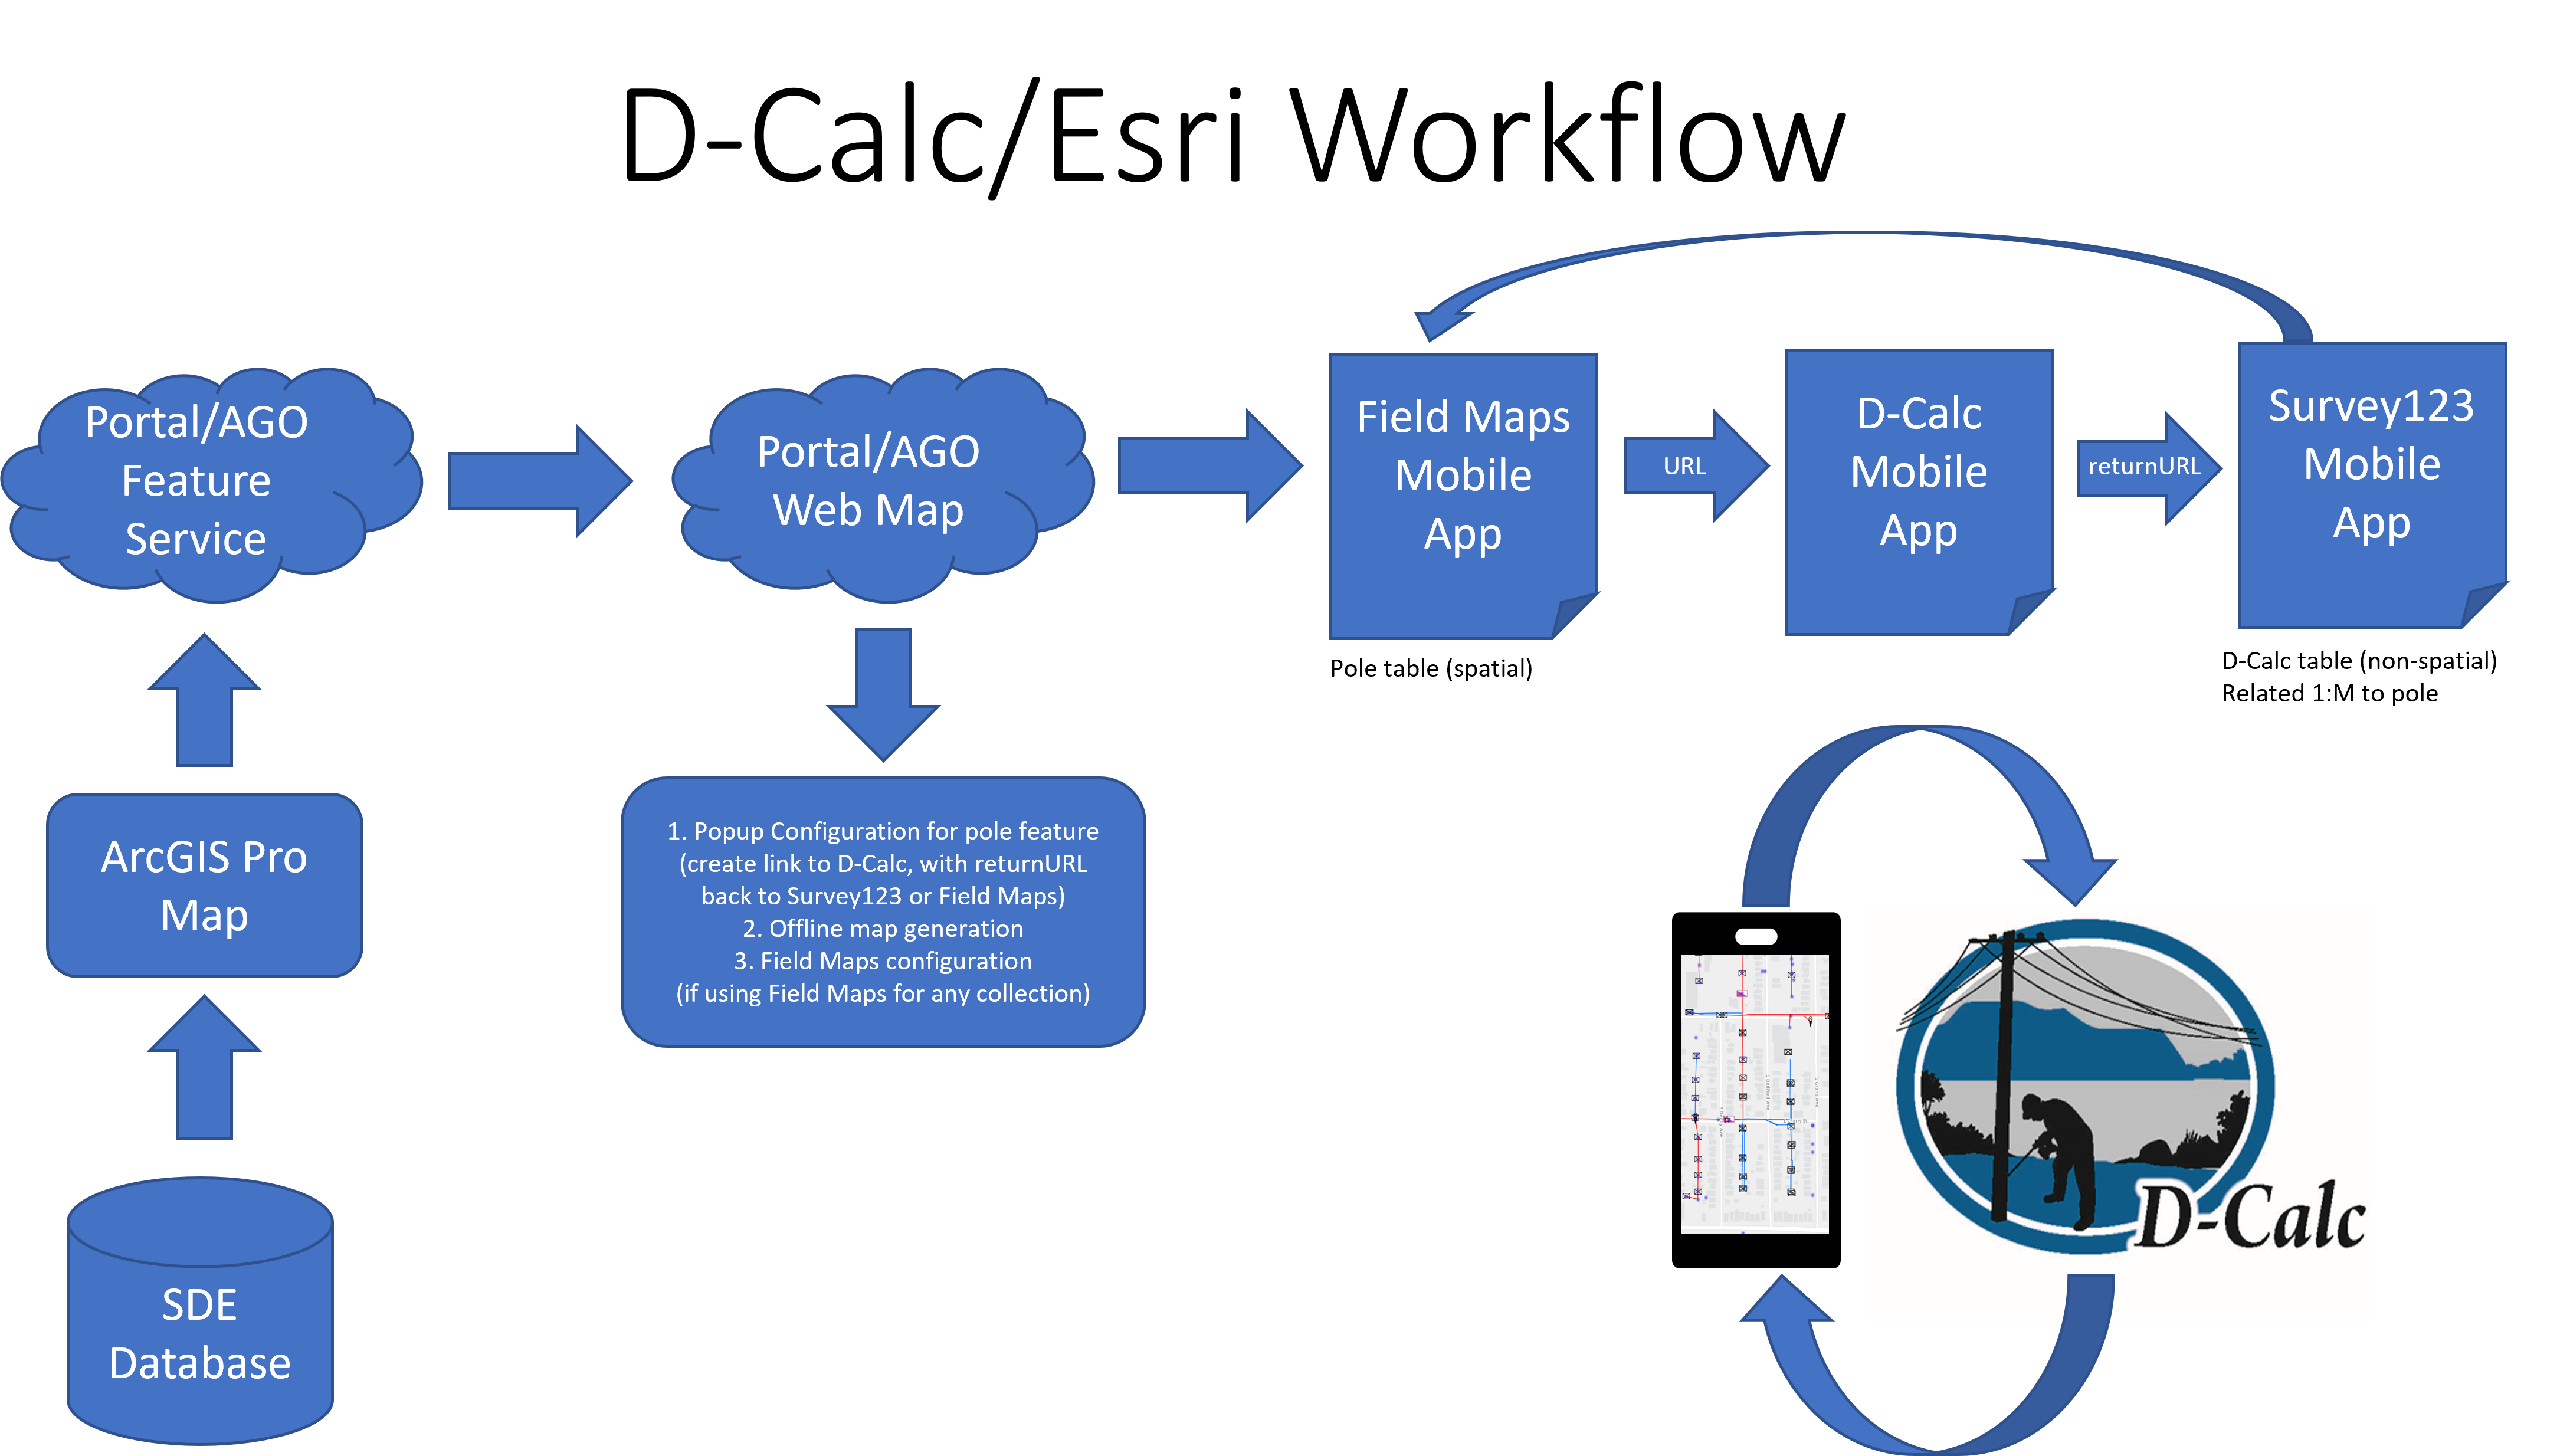
APP LINKING
D-Calc supports URL-based inputs and outputs. D-Calc can thus be launched and pre-loaded from an external application by executing a URL containing valid D-Calc parameters, such as PoleID, circumference, species, class, and length. D-Calc can also return an URL containing output parameters, such as percent remaining section modulus. This method can be used to integrate D-Calc with external applications, such as Esri Field Maps or Survey123, as well as custom applications.
The following subsections outline how to use this parameter-URL method to perform an integration with Esri Field Maps. The same concepts may be used to integrate D-Calc with other products.
D-Calc has been enhanced to support retrieval of an existing pole record and all associated modeled damages, then return output parameters back to the 3rd-party application. This new function for retrieving existing pole records is called viewPole while createPole continues to support the ability to create and model a new pole record,
D-Calc can be integrated to other apps using URL parameters within links. The link will have the following general format:
**TO CREATE NEW POLES: **https://dcalc.edmlink.com/createPole?<input parameters>&returnURL=<ouput app><output app parameters>
**TO VIEW EXISTING POLES: **https://dcalc.edmlink.com/viewPole?<input parameters>&returnURL=<ouput app><output app parameters>
Depending on the function used (viewPole or createPole), this will open D-Calc, view existing and/or create a new pole record, pre-populate the pole record with the parameters given, and then construct a returnURL link to send output parameters back to another 3rd-party app. URL encoding is required in parts of the returnURL for most applications, including Esri.
NOTE: the new viewPole function always requires two and only two input parameters: poleID and projectName
Example: (without URL encoding, for readability)
**TO CREATE NEW POLES:**https://dcalc.edmlink.com/createPole?poleId=535505b0-2797-4a94-b334-bc039fbef3d0&DistGL=0&Circumference=32&description=skdjfjf&Species=Lodgepole Pine&Class=3&Length=40&projectName=New_Project&returnUrl=https://survey123.arcgis.com/share/dcc8df93cc2b46b1b0c5a4d08434aeba?portalUrl=https://EDM.maps.arcgis.com&field:rsm1_net_act=${rsm1_net_act}&field:PoleGUID=${poleId}
**TO VIEW EXISTING POLES:**https://dcalc.edmlink.com/viewPole?poleId=535505b0-2797-4a94-b334-bc039fbef3d0&projectName=New_Project&returnUrl=https://survey123.arcgis.com/share/dcc8df93cc2b46b1b0c5a4d08434aeba?portalUrl=https://EDM.maps.arcgis.com&field:rsm1_net_act=${rsm1_net_act}&field:PoleGUID=${poleId}
Example: (with URL encoding, actual link would need this encoding)
**TO CREATE NEW POLES:**https://dcalc.edmlink.com/createPole?poleId=535505b0-2797-4a94-b334-bc039fbef3d0&DistGL=0&Circumference=32&description=skdjfjf&Species=Lodgepole Pine&Class=3&Length=40&projectName=New_Project&returnUrl=https://survey123.arcgis.com/share/dcc8df93cc2b46b1b0c5a4d08434aeba?portalUrl=https://EDM.maps.arcgis.com%26field%3Arsm1_net_act%3D%24%7Brsm1_net_act%7D%26field%3APoleGUID%3D%24%7BpoleId%7D
**TO VIEW EXISTING POLES:**https://dcalc.edmlink.com/viewPole?poleId=535505b0-2797-4a94-b334-bc039fbef3d0&projectName=New_Project&returnUrl=https://survey123.arcgis.com/share/dcc8df93cc2b46b1b0c5a4d08434aeba?portalUrl=https://EDM.maps.arcgis.com%26field%3Arsm1_net_act%3D%24%7Brsm1_net_act%7D%26field%3APoleGUID%3D%24%7BpoleId%7D
Note: the returnURL parameter set is not required. You may simply pass data into D-Calc from a 3rd-party app and not need to pass data back. But the returnURL is needed if you wish to pass data back from D-Calc into a 3rd-party app. The returnURL output parameters are the same for both viewPole and createPole functions.
The returnURL format needs to match the specification of the 3rd party app you are sending the data to. D-Calc's URL methodlogy was built and tested around Esri's URL parameters for their mobile apps, but the method can theoretically be used for any other app that accepts URL-based inputs.
Esri URL parameter specs:
For support and/or services in creating D-Calcintegrations through URLs, contact Paul Petersen
Input URL Parameters - send information from external application into D-Calc
NOTE: for viewPole, the poleId and projectName are required parameters.
Inputs
- DistGL
- diameter
- Circumference
Metadata
- poleId
- description
- poleName
- projectName
ANSI Values
- Species
- Class
- Length
Output flow
- returnUrl
URL Output Parameters
These are the parameters that D-Calc will return to a 3rd party app from the createPole route. When placed in the returnURL, use the following format: ${parameterName}. For example, ${msx1_act}.
msx1_act - defect-calculated remaining section modulus (moment-slope), transverse, level 1
msy1_act - defect-calculated remaining section modulus (moment-slope), inline, level 1
mix1_act - defect-calculated moment of inertia, transverse, level 1
miy1_act - defect-calculated moment of inertia, inline, level 1
area1_act - defect-calculated remaining area, level 1
rsmx1_act - defect-calculated % remaining section modulus, transverse, level 1
rsmy1_act - defect-calculated % remaining section modulus, inline, level 1
rsm1_net_act - net remaining % section modulus (worst of inline vs. transverse), level 1
ansi_dia1
svg1- svg pole defect graphic, level 1
msx2_act - defect-calculated remaining section modulus (moment-slope), transverse, level 2
msy2_act - defect-calculated remaining section modulus (moment-slope), inline, level 2
mix2_act - defect-calculated moment of inertia, transverse, level 2
miy2_act - defect-calculated moment of inertia, inline, level 2
area2_act - defect-calculated remaining area, level 2
rsmx2_act - defect-calculated % remaining section modulus, transverse, level 2
rsmy2_act - defect-calculated % remaining section modulus, inline, level 2
rsm2_net_act - net remaining % section modulus (worst of inline vs. transverse), level 2
ansi_dia2
svg2 - svg pole defect graphic, level 1
msx3_act - defect-calculated remaining section modulus (moment-slope), transverse, level 3
msy3_act - defect-calculated remaining section modulus (moment-slope), inline, level 3
mix3_act - defect-calculated moment of inertia, transverse, level 3
miy3_act - defect-calculated moment of inertia, inline, level 3
area3_act - defect-calculated remaining area, level 3
rsmx3_act - defect-calculated % remaining section modulus, transverse, level 3
rsmy3_act - defect-calculated % remaining section modulus inline, level 3
rsm3_net_act - net remaining % section modulus (worst of inline vs. transverse), level 3
ansi_dia3
svg3 - svg pole defect graphic, level 1
msx1_ansi
msy1_ansi
mix1_ansi
miy1_ansi
area1_ansi
rsmx1_ansi
rsmy1_ansi
rsm1_net_ansi
msx2_ansi
msy2_ansi
mix2_ansi
miy2_ansi
area2_ansi
rsmx2_ansi
rsmy2_ansi
rsm2_net_ansi
msx3_ansi
msy3_ansi
mix3_ansi
miy3_ansi
area3_ansi
rsmx3_ansi
rsmy3_ansi
rsm3_net_ansi
msx1_org
msy1_org
mix1_org
miy1_org
area1_org
msx2_org
msy2_org
mix2_org
miy2_org
area2_org
msx3_org
msy3_org
mix3_org
miy3_org
area3_org
dia1
dia2
dia3
circ1
circ2
circ3
dist_gl1
dist_gl2
dist_gl3
ansiLength
ansiClass
ansiSpecies
description
fiberStrength
isLinearTaper
poleName
userEmbedment
poleId
l1_d1_type
l1_d1_param1
l1_d1_param2
l1_d1_param3
l1_d1_param4
l1_d2_type
l1_d2_param1
l1_d2_param2
l1_d2_param3
l1_d2_param4
l1_d3_type
l1_d3_param1
l1_d3_param2
l1_d3_param3
l1_d3_param4
l1_d4_type
l1_d4_param1
l1_d4_param2
l1_d4_param3
l1_d4_param4
l2_d1_type
l2_d1_param1
l2_d1_param2
l2_d1_param3
l2_d1_param4
l2_d2_type
l2_d2_param1
l2_d2_param2
l2_d2_param3
l2_d2_param4
l2_d3_type
l2_d3_param1
l2_d3_param2
l2_d3_param3
l2_d3_param4
l2_d4_type
l2_d4_param1
l2_d4_param2
l2_d4_param3
l2_d4_param4
l3_d1_type
l3_d1_param1
l3_d1_param2
l3_d1_param3
l3_d1_param4
l3_d2_type
l3_d2_param1
l3_d2_param2
l3_d2_param3
l3_d2_param4
l3_d3_type
l3_d3_param1
l3_d3_param2
l3_d3_param3
l3_d3_param4
l3_d4_type
l3_d4_param1
l3_d4_param2
l3_d4_param3
l3_d4_param4
Integration with Esri ArcGIS Survey123:
Integrating with Survey123 is the preferred method, as the URL parameters can insert new records into both spatial and non-spatial related tables, plus the URL encoding is a little bit simpler when compared to Field Maps. To integrate D-Calc with Survey123, configure a popup in the webmap that contains a hyperlink (URL) to the D-Calc app and passes parameters (feature attributes) from the webmap into D-Calc. The URL will also contain a "Return URL" that specifies the app that D-Calc will push data into, as well as the D-Calc parameters to be pushed.
The following Arcade expression builds a URL to support the createPole function which:
- Sends the pole's GlobalID, circumference, pole number, species, class, and height into D-Calc as a new pole record in the project called "New_Project"
- After modeling the pole in D-Calc and clicking the "Send Data" button...
- ...the "returnURL" will be executed...
- which opens the Survey123 mobile app,
- ...and opens the specified survey form ID,
- And passes in the remaining section modulus transverse (x) and inline (y) parameters from D-Calc, as well as the pole number and the pole GlobalID (which relates the Survey123 record to the original pole record)
- Note that URL encoding is necessary, but this can easily be done with the Arcade URLEncode() function
var S123urlsource = 'https://dcalc.edmlink.com/createPole?poleId='+$feature.globalid+'&DistGL=0&Circumference='+$feature.Circumference+'&poleName='+$feature.PoleID+'&Species='+$feature.Species+'&Class='+$Feature.Class+'&Length='+$feature.Height+'&projectName=New_Project&returnUrl=';
var FMurlsource='arcgis-survey123://?';
var FMparams='itemID=dcc8df93cc2b46b1b0c5a4d08434aeba';
var FMGID=Mid($feature.globalid,1,36);
URLEncode('&field:PoleNum=${poleName}}&field:PoleGUID=${poleId}&field:msx1_act=${msx1_act}&field:msy1_act=${msy1_act}');
return Concatenate(S123urlsource,FMurlsource,FMparams,FMAtt);
Expanding upon the previous example, to retrieve a previously created and saved pole within D-Calc, a separate popup within the webmap would be configured to call the viewPole function similar to the createPole example above with the exception of the two required input parameters being poleId and projectName. The returnURL can be identical to return any updates (e.g., damages) modeled in D-Calc to Survey123.
Organizations that leverage the SYNC functionality, which will save pole results to the EDM D-Calc Google Cloud, can access those poles from any user/device using viewPole.
The example Arcade would be as follows:
var S123urlsource = 'https://dcalc.edmlink.com/viewPole?poleId='+$feature.globalid+'&projectName=New_Project&returnUrl=';
var FMurlsource='arcgis-survey123://?';
var FMparams='itemID=dcc8df93cc2b46b1b0c5a4d08434aeba';
var FMGID=Mid($feature.globalid,1,36);
URLEncode('&field:PoleNum=${poleName}}&field:PoleGUID=${poleId}&field:msx1_act=${msx1_act}&field:msy1_act=${msy1_act}');
return Concatenate(S123urlsource,FMurlsource,FMparams,FMAtt);
Integration with Esri ArcGIS Field Maps
D-Calc can also integrate with Field Maps, but the functionality is a bit more limited, since (as of date of this writing), Field Maps does not allow insert or editing of related non-spatial tables via URL parameters. That said, if the workflow is to write D-Calc results back into the spatial "pole" layer, then it is a good fit. (ie, returned D-Calc info is "flat" with the spatial pole (inspection) layer, rather than inserted into a new, non-spatial related table). Field Maps is also appealing for simplicity (no need to deploy Survey123 if you don't really need it).
The following Arcade expression may be deployed in the Esri webmap to construct a URL for createPole, which can be added to the layers popup as a hyperlink:
var S123urlsource = 'https://dcalc.edmlink.com/createPole?poleId='+Mid($feature.globalid,1,36)+'&DistGL=0&Circumference='+$feature.Circumference+'&poleName='+$feature.PoleID+'&Species='+$feature.Species+'&Class='+$Feature.Class+'&Length='+$feature.Height+'&projectName=New_Project&returnUrl=';
var FMurlsource='https://fieldmaps.arcgis.app?';
var FMparams='itemID%3D60b6642c6597493eba3200631ae2e8b3%26referenceContext%3DupdateFeature%26featureSourceURL%3Dhttps://services1.arcgis.com/dscgdziA6jUxpQJw/arcgis/rest/services/DCalc_Schema/FeatureServer/0%26';
var FMGID=Mid($feature.globalid,1,36);
var FMAtt=URLEncode('&featureAttributes={"Net_RMS":"')+'${rsm1_net_act}'+URLEncode('","DCalc_Defect1":"')+'${l1_d1_type}'+URLEncode('","DCalc_Defect2":"')+'${l1_d2_type}'+URLEncode('","DCalc_Defect3":"')+ '${l1_d3_type}'+URLEncode('","DCalc_Defect4":"')+ '${l1_d4_type}'+URLEncode('"}');
return Concatenate(S123urlsource,UrlEncode(FMurlsource),FMparams,'featureID%3D',FMGID,FMAtt);
The following Arcade expression may be deployed in the Esri webmap to construct a URL for viewPole, which can be added to the layers popup as a hyperlink:
var S123urlsource = 'https://dcalc.edmlink.com/viewPole?poleId='+Mid($feature.globalid,1,36)+'&projectName=New_Project&returnUrl=';
var FMurlsource='https://fieldmaps.arcgis.app?';
var FMparams='itemID%3D60b6642c6597493eba3200631ae2e8b3%26referenceContext%3DupdateFeature%26featureSourceURL%3Dhttps://services1.arcgis.com/dscgdziA6jUxpQJw/arcgis/rest/services/DCalc_Schema/FeatureServer/0%26';
var FMGID=Mid($feature.globalid,1,36);
var FMAtt=URLEncode('&featureAttributes={"Net_RMS":"')+'${rsm1_net_act}'+URLEncode('","DCalc_Defect1":"')+'${l1_d1_type}'+URLEncode('","DCalc_Defect2":"')+'${l1_d2_type}'+URLEncode('","DCalc_Defect3":"')+ '${l1_d3_type}'+URLEncode('","DCalc_Defect4":"')+ '${l1_d4_type}'+URLEncode('"}');
return Concatenate(S123urlsource,UrlEncode(FMurlsource),FMparams,'featureID%3D',FMGID,FMAtt);
OFFLINE MODE
D-Calc is a progressive web app (PWA), but does function without internet connectivity, using code and graphics that are cached on the device. Here are a few best practices and tips for successfully using D-Calc without internet connectivity:
- It’s best to “ping” D-Calc while you still have internet connection. For example, before heading out to the field, simply open and then close D-Calc on your device. Doing so will ensure that everything is current and that the cache on the device is initialized. There can be issues when D-Calc has not been used for a long time (weeks) and then is opened in offline mode. This “ping” should alleviate such issues.
- D-Calc will perform a license check every 30 days. If D-Calc has not been used in online mode in over 30 days, then it may fail to function if opened in offline mode.
- If you have very poor cellular coverage, D-Calc actually functions better in Airplane Mode. If there is a very weak cell signal, D-Calc will try to hit the server and may fail or take a long time to achieve success. Switching the device to Airplane Mode bypasses this process, so you may see a faster initial load.

FAQ's
Question: Does D-Calc perform pole-loading calculations?
Answer: No. D-Calc only calculations percent remaining section modulus at a given pole cross-section. This can be used to determine risk of the pole breaking at that cross section location.
Question: Is a free trial available?
Answer: Yes. Contact ppetersen@edmlink.com for a free, 30-day trial of D-Calc. Only applies to new customers.
Question: Can D-Calc be integrated with other apps?
Answer: Yes. There are several options to embed or link D-Calc to other applications:
- D-Calc API - connected mode only, API licensing required
- D-Calc iOS library - connected or disconnected modes, iOS only, Enterprise licensing required
- D-Calc app linking - connected or disconnected modes. All O.S. platforms supported. Included with all core D-Calc licenses.
Contact ppetersen@edmlink.com for more information on options, pricing, and integration support.
Question: How many devices can one D-Calc license be installed on?
Answer: D-Calc may be used on two devices per license. For example, the same person (email address) may log into to D-Calc on a smartphone and on a laptop PC. If the person tries to use D-Calc on a third device, the app will simply prompt the user to deactivate D-Calc on one of the other two devices. After doing so, the new device may be used with that license.
Question: What are the pricing models for D-Calc?
Answer: D-Calc offers both perpetual and subscription-based pricing models.
Core product licensing:
- $50/user/month -or-
- $500/user/year -or-
- $950/user/perpetual
API licensing:
- $5,000 per 25,000 poles
iOS library licensing:
- Enterprise-only. Call EDM for quote.
- Unlimited users
Question: I cannot pay online by credit card (due to organizational policy, credit card limit, etc). Can I bypass the online registration and payment?
Answer: Yes! Contact EDM, and we can provide alternate avenues of payment (Purchase Orders, etc). We can then side-load your registration into the system. Note that monthly and yearly licensing must be purchased online, so offline payment only is available for perpetual core licenses, the API, and the iOS library.